

Do your pictures present indicators of chromatic aberration, also called shade fringing or purple fringing?
It’s a typical
drawback. And it could simply cut back the standard of your pictures.
Happily, there
are just a few easy methods to cope with chromatic aberration in order that your pictures are
free from shade fringing.
On this article, I’m
going to elucidate how chromatic aberration happens. After which I’m going to indicate
you many simple methods to eliminate it.
Let’s dive proper in.
What Is Chromatic Aberration?
What Is Chromatic Aberration? Chromatic aberration is shade fringing that happens in high-contrast areas of your photographs. You’ve most likely observed it as purple fringes in your pictures (although it will also be purple, inexperienced, blue, and extra).
Have a look at the panorama photograph:

Do you see the purple and inexperienced fringing alongside the perimeters of the timber?
Let’s zoom in:
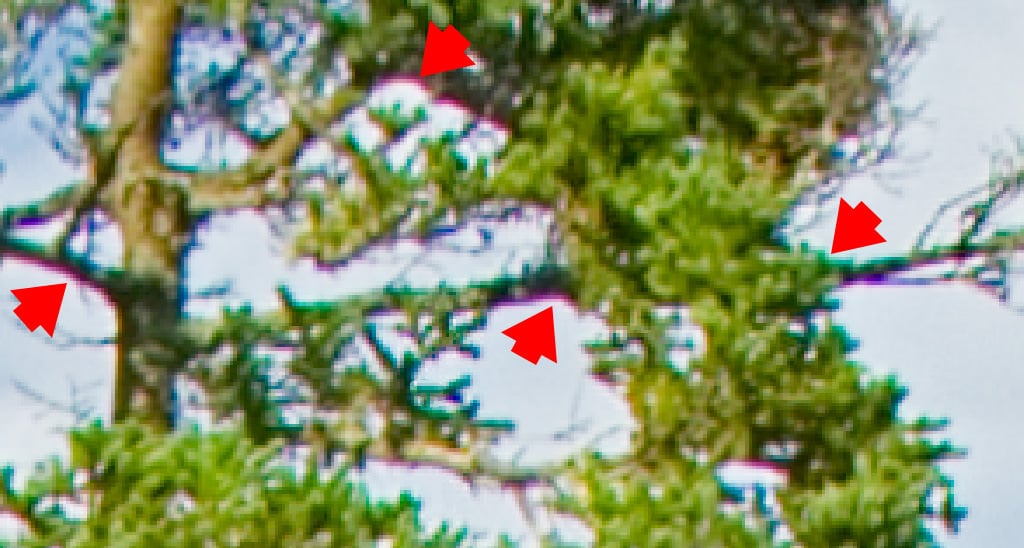
That’s chromatic aberration.
What Causes Chromatic Aberration?
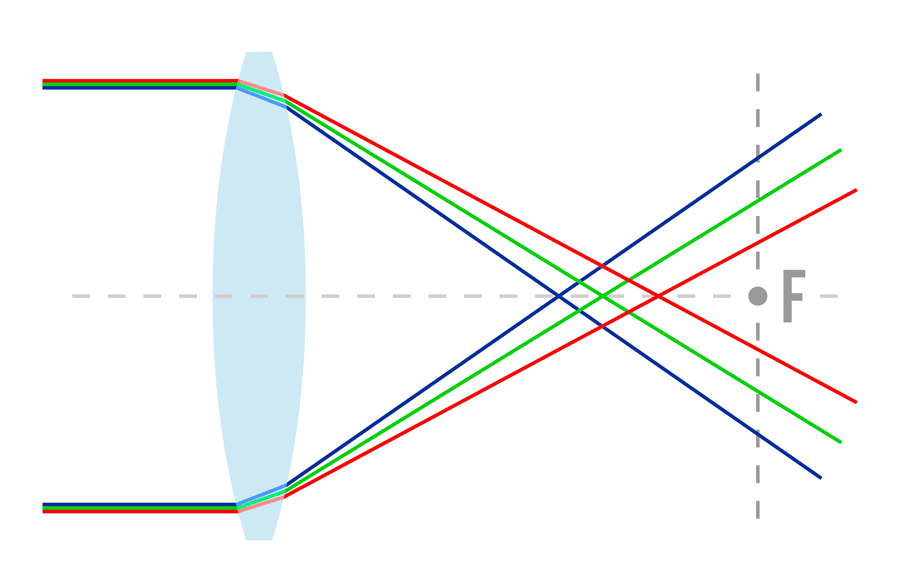
Chromatic aberration happens when gentle passing via your lens bends at completely different angles. You see, some wavelengths of sunshine bend greater than others after they move via the lens. And this causes sure colours (particularly purple, purple, inexperienced, and blue) to seem in undesirable locations.
Chromatic aberration is an issue brought on by your lenses, and mainly each lens shows chromatic aberration to some extent.
However you don’t have to
be afraid of chromatic aberration. As a result of there are strategies of minimizing it
whereas capturing–and, if it turns into a major problem, you’ll be able to take away it simply
in packages reminiscent of Lightroom or Photoshop.
Easy methods to Keep away from Chromatic Aberration?
1. Use Excessive-High quality Lenses
The primary strategy to decrease chromatic aberration is to purchase high-quality lenses. The higher the glass, the much less chromatic aberration shall be a problem. It’s because the most effective lenses (Canon 17-40mm for instance) are made to restrict the separation of sunshine when it passes via the glass components. Search for lenses with low-dispersion components. These are designed to considerably cut back shade fringing.
However what in the event you can’t afford these costly lenses? What then?
2. Keep away from Excessive Distinction Scenes
To begin with, you’ll be able to
keep away from conditions that lead to numerous shade fringing. The actual fact is that many
scenes don’t set off a lot chromatic
aberration in any respect. The secret is to maintain issues low-contrast.
Associated: Huge Angle Lenses: The Final Information
So in the event you’re capturing a darkish topic on a white background, change the background. Attempt to shoot your topic on a background that’s much like its most important colours. As a substitute of capturing a purple flower towards a shiny white background, shoot towards a inexperienced background. And chromatic aberration will immediately develop into much less of a problem.
3. Enhance the Aperture Worth
One other approach that everybody can decrease chromatic aberration is by stopping down. That’s, use an aperture a cease or two past your lens’s most. For those who’re working with an f/2.8 lens, cease all the way down to f/4 or f/5.6. Numerous the colour fringing will disappear.
4. Hold Your Topic Near the Heart
It’s also possible to strive inserting your topic towards the middle of the body. One sort of shade fringing (lateral chromatic aberration) solely happens on the edges of the body. By positioning your most important topic on the middle of the picture, you cut back the impact that CA has in your photograph.
However generally,
chromatic aberration will get out of hand, and there’s nothing you are able to do about it
within the area.
That’s the place
post-processing is available in.
How Do You Repair Chromatic Aberration With Publish-Processing?
When modifying out
chromatic aberration, I like to make use of Lightroom or Photoshop, and I recommend you
do the identical. Each of those packages supply highly effective instruments to rid your pictures of
chromatic aberration–with out
considerably damaging picture high quality.
For those who favor to make use of
Lightroom (which is my go-to picture modifying program), then learn on.
Easy methods to Take away Chromatic Aberration in Adobe Lightroom
There are two easy
methods of eliminating chromatic aberration in Lightroom.
Each require the
Lightroom Lens Corrections panel.
- Step 1: Open Lightroom, then click on on the Develop module.
- Step 2: Scroll down on the right-hand facet till you see the Lens Corrections heading. Click on to open the panel.
- Step 3: Merely verify the Take away Chromatic Aberration field.
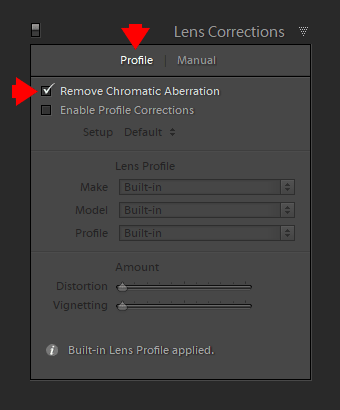
This typically does job of eradicating fringing
Nonetheless, in the event you’re
not glad with this methodology, you’ll be able to take away chromatic aberration manually:
- Step 4: Click on on the Shade choice within the Lens Corrections panel.
- Step 5: Then click on on the eye-dropper device.
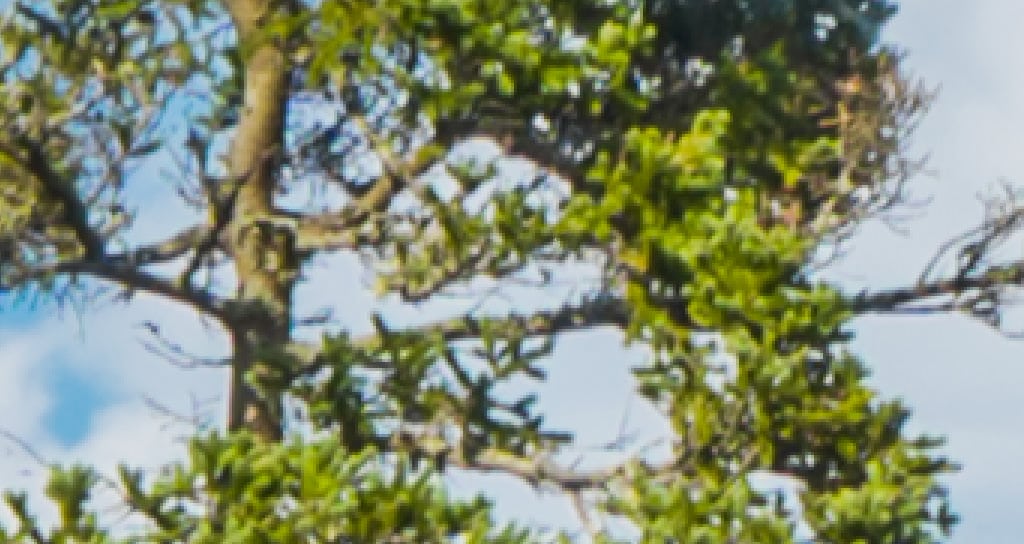
- Step 6: Place the eye-dropper device alongside the fringing and easily click on – and watch because the fringing is eliminated (see picture beneath).

You’re additionally free to regulate the elimination ranges manually through the sliders within the Lens Corrections panel. As an illustration, you’ll be able to enhance the purple fringing eliminated by pushing up the Quantity slider.
See additionally: Excessive High quality Fujifilm Lenses Immediately
You may even change
the fringing hue with the Purple Hue and
the Inexperienced Hue sliders. Simply drag the
sliders to change the colour you need to take away.
Easy methods to Take away Shade Fringing in Photoshop
Primarily based on my expertise, the Lightroom chromatic aberration elimination strategies cowl 99% of conditions. And solely in extreme instances, I want to make use of Photoshop.
Go forward and watch this video, which takes you thru the colour fringing elimination course of in Photoshop:
Conclusion
Now you realize precisely
what chromatic aberration is–and that it’s nothing to be nervous about.
As a result of it’s simple to
decrease by capturing with high-quality lenses, or by stopping down your lens.
And if you find yourself with a picture stuffed with ugly chromatic aberration, you’ll be able to all the time take away it with a few fast clicks in Lightroom!
On the identical time, it’s significantly better to select the lens wich produces minimal chromatic aberration.